
Saturday, August 11, 2007

Revamped Diagram - NOT FINAL


So, after reading Friday's comments I kind of revamped my diagram. I had started building a 3d model to which I was going to apply graphics to but didn't have a developed way to show the time relationship without limiting myself. I have since changed the diagram in which the bars demonstrated are indicating the time relationship in comparison with each step. I am showing 2 diagrams right now as it is not complete but I wanted to get some feedback. The first is the graphic diagram without the color. When I was completing the graphic portion of it I realized that at first glance the start and stop and overlapping of the steps was not 100% clear. I went online to research the logo further and came across the old logo with the 6 color bands so I decided to try to use those to further depict the start and stop of the steps. Please let me know if you have any questions. The colors will be overlayed on the graphic apple and will be less opaque so that one can see the graphics behind the colors. Similar to the bottom left corner of the color apple but even less opaque. Oh, by the way the colorbands obviously aren't finished being touched up. I was wondering if you all think I need to actually put a label over the steps on the diagram. I am hoping not to and hope that the images depict enough compared to my written directions on my last post.

Wednesday, August 8, 2007

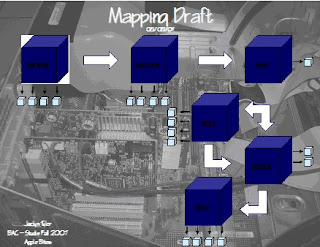
Mapping Draft


This is my preliminary draft for my model. This is purely conceptual. My plan is to intertwine the steps below (demonstrated by the blocks above) into a diagram utilizing the parts of a motherboard. That is the reason for the motherboard photo as the background to my draft diagram.


STEP 1: REALIZATION OF A NEED/BROWSE

a. Log onto http://www.apple.com/ by typing the address into the web browser
b. Click on the Store Tab on the top left of the page
c. Browse the different models of the product your in need of (offered in your list of by clicking on any of the items along the left side of the page)
d. Settle on the type of product you wish to buy
e. Research other comparable models online
f. Come to the realization that Apple is the best buy


STEP 2: PURCHASE

a. Select the item you wish to purchase and click on the add to cart button
b. Click the Check out now button
c. Create an account when prompted to
d. Provide Billing and Shipment information when prompted to
e. If you don’t know if you will be at home during the delivery time be sure to note that the UPS carrier can leave the package on the porch
f. Provide Payment information when prompted to
g. Verify your information and edit if needed
h. Confirm purchase
i. Check e-mail for Purchase verification


STEP 3: WAIT

a. Resume normal activity as you await the delivery of your package.


STEP 4: TRACK

If you have no desire to know exactly where your package is at all times skip to step 5
Otherwise review the e-mail you received from apple stating your tracking number

a. Log onto http://www.ups.com/ by typing the address into the web browser
b. Enter the tracking number issued in the email from apple
c. Check the terms and conditions box and left click on track button
d. Repeat steps 4a – 4c as often as desired until package has arrived.


STEP 5: RECEIVE

a. If you will not be home upon the packages arrival, leave a note in the door to verify that the UPS carrier may leave it on the porch without your signature.
b. If home when package arrives, sign for it as instructed by UPS carrier.


STEP 6: OPEN

a. Upon arrival utilize a pair of scissors or a knife to carefully cut along the tape on the top of the box
b. Proceed to opening the box by lifting all four flaps
c. If protecting material is enclosed remove it from the box and discard it
d. Remove product from the box
e. Examine the product for damage that may have occurred during transportation.